I’m working on a dashboard to track COVID-19 cases per capita in Calgary, and while the government’s open data API provides daily case counts within the city it doesn’t have any history available. The easy solution to this is to download the data on a daily basis and archive it myself, but I want to automate the download and loading into the database so I don’t have to think about it. Luckily, MySQL and a bit of shell script goes a long way.
Contents
Before you start
Introduction
Software required
This tutorial assumes that you are using a Linux system, like Ubuntu 20.04, and already have MySQL 8 installed. If you haven’t installed MySQL 8 yet, see my post Installing MySQL 8 on Ubuntu 20.04 for instructions.
Tutorial
Step 1: System set up
Create a new system user for your ETL
To ensure security on my server, I am going to set up a separate user for all this work which has a limited set of permissions. The new user will be named (imaginatively) etl.
To create the new system user, run the following command in a shell and provide a secure password for the user when prompted.
sudo adduser etlCreate a group for ETL users
MySQL 8 by default restricts file uploads / downloads to the /var/lib/mysql-files/ directory in Linux systems. To upload a file into our database we need to place it in this directory, however initially only the mysql user has access to it. To solve this we will create a new user group, assign the mysql and etl users to it, and then give that group access to the directory.
Start by creating a new group called mysql-files by running the following command:
sudo groupadd mysql-filesNext, we’ll add the mysql and etl users to our newly created group:
sudo usermod -a -G mysql-files mysql
sudo usermod -a -G mysql-files etl
After that, we’ll change the ownership of the /var/lib/mysql-files/ directory over to our newly created mysql-files group:
sudo chown :mysql-files /var/lib/mysql-files/Lastly, we’ll give the mysql-files group read and write access to the /var/lib/mysql-files/ directory:
sudo chmod 770 /var/lib/mysql-files/Step 2: Database set up
To start our database set up, run the following command in a shell to launch MySQL:
sudo mysqlCreate a new SQL user for your ETL
To create the new etl user at the MySQL prompt enter:
CREATE USER 'etl'@'localhost' IDENTIFIED WITH auth_socket;Create a database for the data and assign privileges to the etl user
Our next step is to create a database for the information we want to store, using the command below. Since I’m going to be storing COVID-19 data, I am going to name the new database Covid but you can change the name to suit your data set.
CREATE DATABASE Covid COLLATE = 'utf8mb4_general_ci';To give our etl user the ability to make changes on the covid database we’ll use the GRANT command followed by FLUSH PRIVLEDGES so the changes take effect:
GRANT ALL ON Covid.* TO 'etl'@'localhost';
GRANT FILE ON *.* TO 'etl'@'localhost';
FLUSH PRIVILEGES;
Create a table for our data
Now we need to create a table to store our data. This involves looking at the data you want to load, considering the appropriate data types and keys for the columns, and then building a table to suit. This will be different for every project, but here’s how I approached it for this dataset.
The data I want to load can be found at COVID-19 in Alberta: Current cases by local geographic area and it looks like:
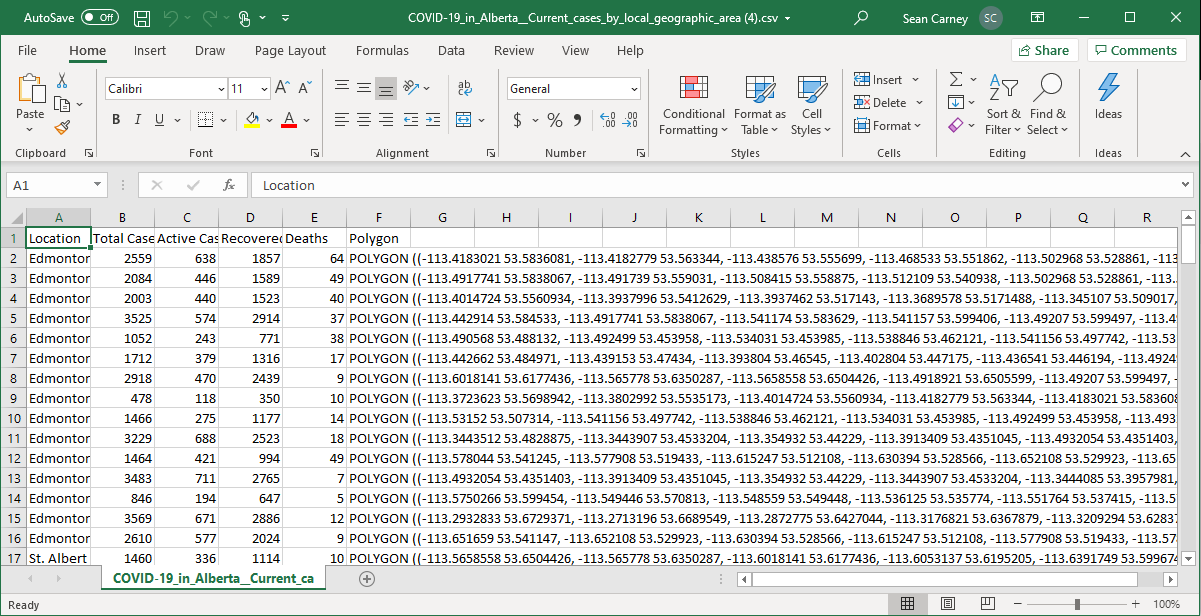
So based on this, I need to create a table with at least six columns, using text formats for the locations / polygons and number formats for the case count information.
I’ll also want to add two additional columns to my table, the first for a primary key and the second for a time stamp of when the data was loaded to the database. The source data doesn’t have a timestamp on it, so loading the data into a table each day without providing some means of identifying when the data was collected would result in an unusable mess.
The SQL command to create the table I need is:
CREATE TABLE Covid.CasesByGeography (
	PrimaryKey INT NOT NULL AUTO_INCREMENT,
	Location VARCHAR(255) NULL,
	TotalCases INT NULL DEFAULT NULL,
	ActiveCases INT NULL DEFAULT NULL,
	RecoveredCases INT NULL DEFAULT NULL,
	Deaths INT NULL DEFAULT NULL,
	Polygon TEXT NULL,
	LoadDate TIMESTAMP NOT NULL DEFAULT NOW(),
	PRIMARY KEY (PrimaryKey)
)
COLLATE='utf8mb4_general_ci';
I’ve set the primary key and timestamp to both have default values, the primary key simply increments and the timestamp uses the current time. This is helpful since these values will automatically be filled in when we are loading the data and we don’t need to circle back and add them later.
At this point we’re done working in MySQL so exit by typing:
exitStep 3: Build the ETL
Now that we’ve got all the background work completed, we can focus on building the actual ETL process which will download the data and load it into the database. We are going to approach the ETL in two steps, building a shell script to download the data and run a database script, and building the database script to load the data.
Change users
From this point forward, all the scripts should be created in the etl user’s account, since this is the account which will be running the scripts. The easiest way to proceed is to log out of your server and log in again as the etl user for the remaining steps.
Creating the shell script
To start, I’m going to create a shell script that will download the data, load it into the database, and then delete the source file that we downloaded. We’ll start by creating a new file at the shell:
touch ~/CovidETL.shand then setting the file so that it is executable:
chmod 744 ~/CovidETL.shNow, we need to write the shell script itself. Begin editing the file by opening the nano text editor:
nano ~/CovidETL.shThen, add the following to the blank file:
wget -O /var/lib/mysql-files/CovidData.csv https://data.edmonton.ca/api/views/ix8f-s9xp/rows.csv?accessType=DOWNLOAD
mysql < /home/etl/CovidETL.sql
rm /var/lib/mysql-files/CovidData.csv
Let’s step back and walk through this line by line. What we are doing in this script is:
- First, we use
wgetto download the csv file fromhttps://data.edmonton.ca/api/views/ix8f-s9xp/rows.csv?accessType=DOWNLOADand save it as/var/lib/mysql-files/CovidData.csvon our server. - Next, we launch
mysqland ask it to run a SQL statement stored in the fileCovidETL.sql - Lastly, we delete the file
/var/lib/mysql-files/CovidData.csvsince it’s not needed any more.
Your file should now look like this:
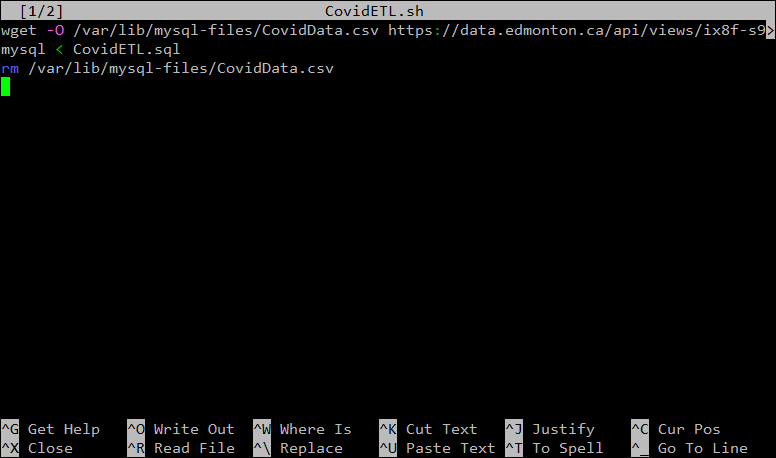
Once that’s all in the file, press CTRL + X to close the file, and Y to save it.
Creating the SQL script
You’ll have noticed in the last step that we are asking MySQL to run a script from a file that doesn’t exist yet. Let’s fix that now.
Again, begin editing the file by opening the nano text editor:
nano ~/CovidETL.sqlThen, add the following to the blank file:
LOAD DATA
        INFILE '/var/lib/mysql-files/CovidData.csv'
        INTO TABLE Covid.CasesByGeography
        FIELDS TERMINATED BY ','
                OPTIONALLY ENCLOSED BY '"'
                ESCAPED BY '"'
        LINES TERMINATED BY '\n'
        IGNORE 1 LINES
        (Location, TotalCases, ActiveCases, RecoveredCases, Deaths, Polygon);
Once again, lets walk through this line by line. What we are doing here is:
- Letting MySQL know that we want to
LOAD DATAinto a table - The data will come from the file
/var/lib/mysql-files/CovidData.csv - We want the data to be placed in the
Covid.CasesByGeographytable - Since we are using a csv file, the fields (columns) are separated by commas, and text might be wrapped in double quotes.
- Each line ends with a line break character.
- The first line of the file has the column names, so we want to skip it.
- Lastly, we are providing the names of each field in the order that they appear in the file so that everything gets loaded into the right place in our table.
Your file should now look like this:
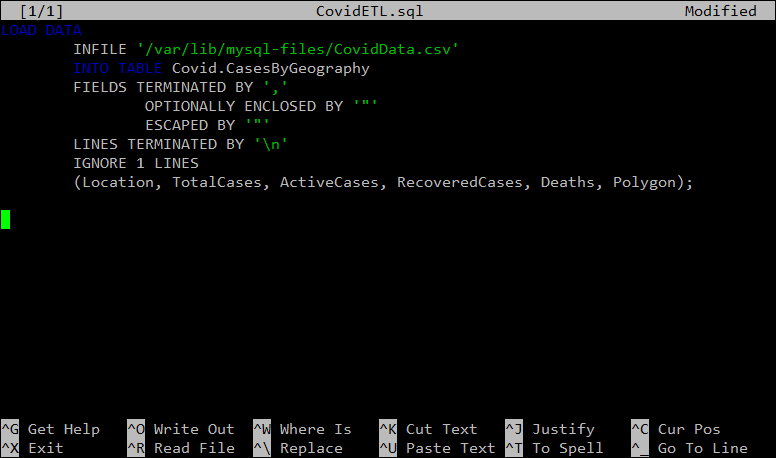
Like before, press CTRL + X to close the file, and Y to save it.
Step 4: Schedule the ETL
We’ve created all the logic to download the data and load it into our database, but now we need to automate it and have it run every day. In Linux, the task scheduler is called cron and we can use it to have this code run at any interval we want.
Edit the crontab
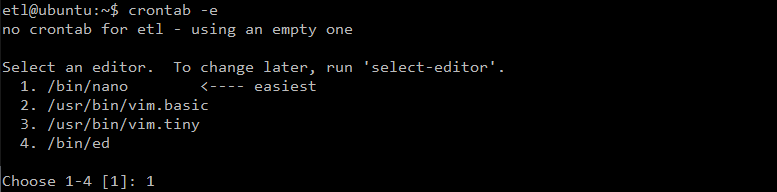
To edit the list of scheduled tasks, run:
crontab -eNext you’ll be asked which editor you want to use. Press 1 to select nano which is the easiest text editor to use.
Once the file opens, use your arrow keys to move the cursor down to the bottom of the file.
In the crontab file, we can control when tasks are run based on the:
- Minute
- Hour
- Day of month
- Month
- Day of week
For each of these, we can either specify a number (for when we want the task to run) or use an asterisk to indicate that the task should be run at each time period possible.
So, in order to run our ETL shell script each night at 3:00 AM, we want to add the following line to bottom of the file:
0 3 * * * /home/etl/CovidETL.shThe bottom of your edited crontab file should now look like this:
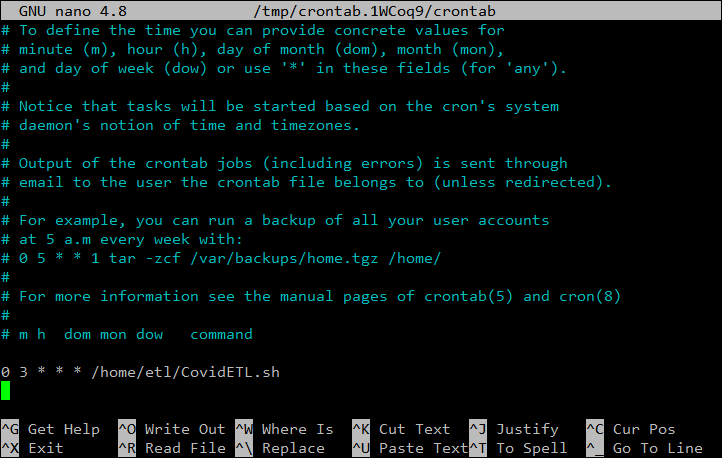
Just like before press CTRL + X to close the file, and Y to save it.
Using your ETL
Testing
Now we are all set up. Each night at 3:00 AM, the server will download the csv file and load it into the table that we created.
If we want to test the ETL immediately, we can call the script from the terminal using:
~/CovidETL.shYou’ll see some output from the csv being download before being returned to the terminal.
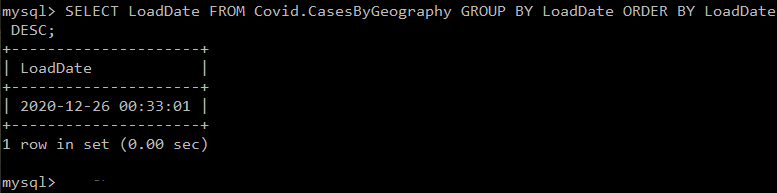
In order to check whether this worked, let’s have a look in MySQL. First open MySQL using:
mysqlThen we can query the Covid.CasesByGeography table to see whether data has been recently added:
SELECT LoadDate FROM Covid.CasesByGeography GROUP BY LoadDate ORDER BY LoadDate DESC;Which, if everything is working, should result in a recent timestamp being displayed like this one:
What next
This guide hopefully gave you an idea of how you can leverage shell scripts and SQL to automatically load data into a database on a regular basis. From here you can expand on these ideas by adding multiple data sources, doing additional data transformation as part of the load process, and building / rebuilding aggregate tables as part of the scheduled SQL.
I hope this was helpful. Let me know if you have any questions below or in the comments or by using the contact form. I’d love to hear from you.
Leave a Reply